# Establishing a connection with Acumatica
After the package has been published, the connector must be established within Acumatica
# Configuring the Connector in Acumatica
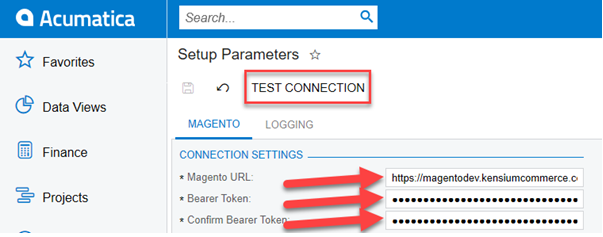
The first step in configuring the Magento Connector is to setup the parameters of the connector. Navigate to the Magento Connector workspace and click Setup Parameters. Navigate to the Connection Settings section.
Enter the Magento URL.
- This is the store URL for the Magento eCommerce website.
Enter the Bearer Token.
The Bearer Token can be found on the Magento site.
Navigate to the System workspace on the Magento Site.
Click Integrations under the Extensions workspace.
Click the Pencil Icon next to the ACE integration.
The Bearer Token will be listed under the Access Token field.
Enter the Bearer Token again to Confirm Bearer Token.
Click Test Connection.
- A success message will render if the connection is successful.
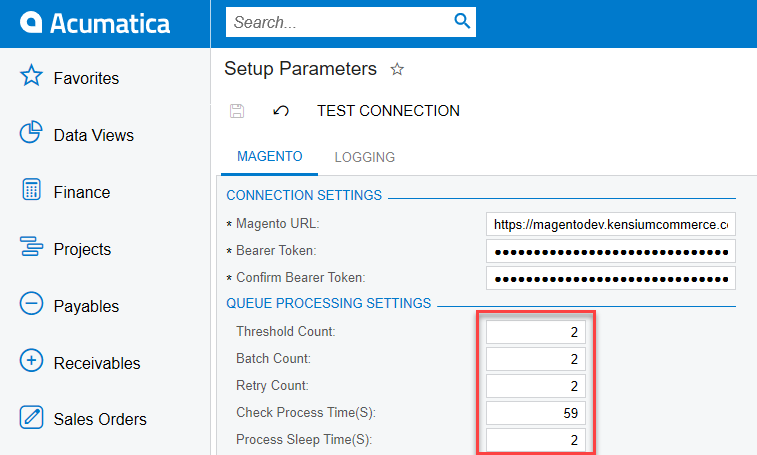
Next, navigate to the Queue Processing Settings section.
Enter a Threshold Count.
- The Threshold Count value indicates the number of records that will be sent individually from Acumatica to Magento prior to the records being batched. (e.g. if there are 50 records being sent, and the threshold count is 25, then the records are batched by using the count defined in the Batch count value and sent to Magento. If the batch count defined is for 25, then Acumatica batches 25 messages in one request and makes only 2 requests to Magento.) This setting is applicable only for the Pricing and Inventory sync.
Enter a Batch Count.
- The batch count value indicates how many records will be added to an FTP call for bulk record sync. This reduces sync time by making multiple, smaller FTP calls. (e.g. if syncing 50 records, the threshold count is set to 25, and the batch count is set to 5, the 50 records will be sent in 10 API calls, each containing 5 records to be synced.). This setting is applicable only for the Pricing and Inventory sync.
Enter a Retry Count.
- This value is the number of times Acumatica attempts to send across a message to Magento before rendering them as a Failed message. All failed messages are not attempted automatically by the application. To process any Failed messages, you can use the Reprocess Failed Messages screen in the Magento Connector workplace.
Enter a Check Process Time.
- The accepted value for this option is between 1 and 59. This value defines the frequency in number of seconds for which a schedule once initiated by the framework continues to execute. All schedulers defined by the Magento Connector are scheduled to run every 1 minute. This setting is an extension of the default scheduling to define if the process should be slowed down and controlled. When the framework initiates a scheduler as per the defined schedules, the scheduler first completes the designated task. It then checks for the time for which the process should continue to run based on the already elapsed time versus the defined check process time. If the already elapsed time is less than the Check process time, then the scheduler thread continues to run until the time it has elapsed the time defined in the Check Process time.
Enter a Process Sleep Time.
- This value is the time between check processes in seconds. (e.g. if the check process time is set to 50 seconds, and the process sleep time is set to 5 seconds, the connector will first finish the expected tasks when it launches. Once the task is completed, it sleeps for the defined amount of time and then checks for any new records to be processed. This setting is controlled by the Check Process Time setting above.
- This value is the time between check processes in seconds. (e.g. if the check process time is set to 50 seconds, and the process sleep time is set to 5 seconds, the connector will first finish the expected tasks when it launches. Once the task is completed, it sleeps for the defined amount of time and then checks for any new records to be processed. This setting is controlled by the Check Process Time setting above.
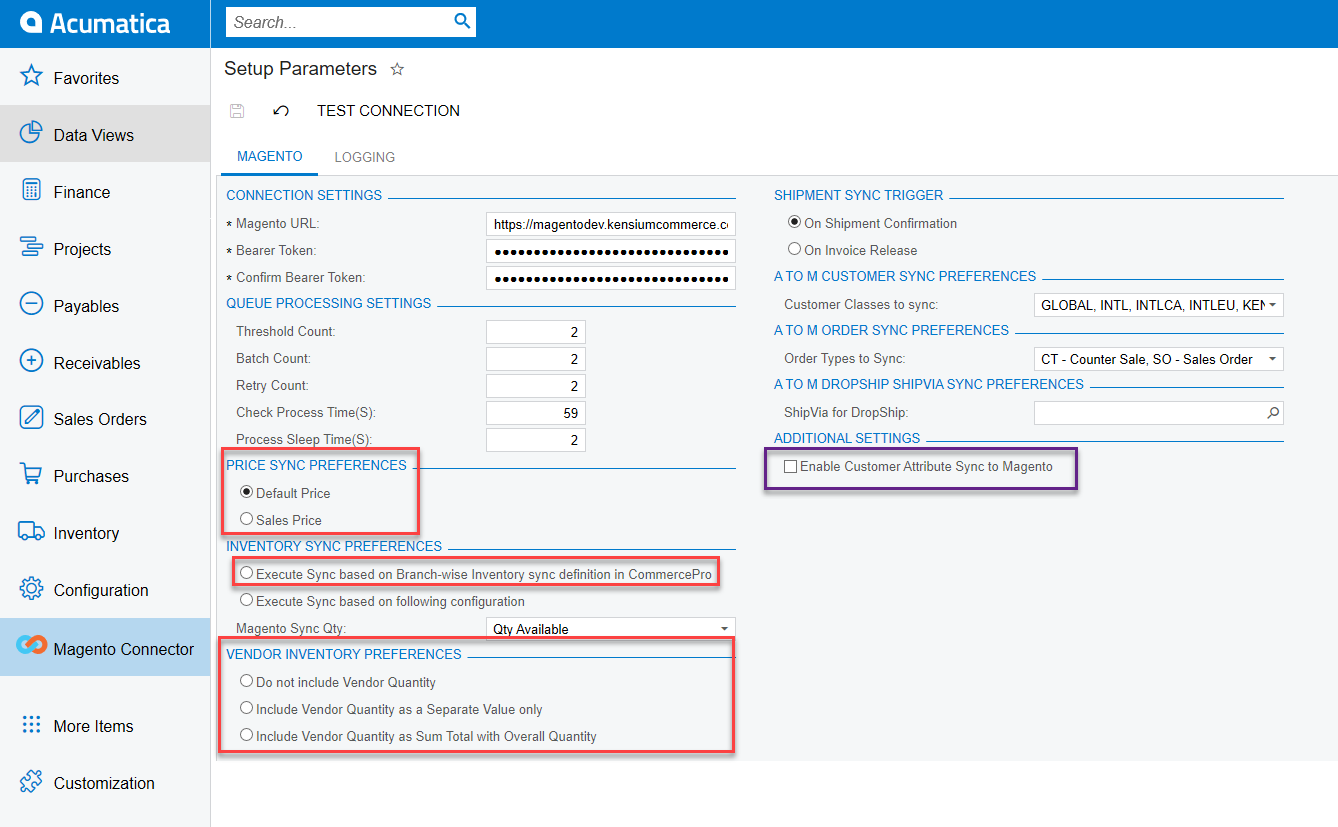
If utilizing the Commerce Pro package, a section will appear in the Setup Parameters screen that will be unique to this package: Price Sync Preferences.
- Toggle the selection of price to sync with the connector
- Default Price
- Sales Price
- The Sales Price of the item is listed on the stock item screen. This can be configured during the configuration of the CommercePro Package
Next, navigate to the Inventory Sync Preferences
- If using the CommercePro Package, toggle the selection of the Inventory sync preference that you’d wish to use.
- Execute Sync based on Branch-wise inventory sync definition in CommercePro.
- Branch-wise inventory allows for the maintaining and tracking of inventory on a branch by branch basis. This option will allow a user to allocate inventories by branch.
- Execute sync based on following configuration.
- Select the monitor and Publish settings for Quantity. This is the value that gets published to Magento as the default available quantity for a product: Quantity Available, Quantity Available for Shipping, Quantity Available on Hand.
- Select the warehouse(s) to be monitored by the connector
- Select the Magento Sync quantity value. If the CommercePro package is not published, the only fields available in this section are listed in steps above.
- Execute Sync based on Branch-wise inventory sync definition in CommercePro.
Navigate to the Vendor Inventory Preferences section. This section is available only when the CommercePro package is published.
- Select a vendor inventory sync preference.
- This section offers options on how to show available vendor inventories from Acumatica to Magento. Vendor inventory quantities can be included as a separate value in Magento or as a part of the overall inventory quantity in Magento.
Navigate to the Shipment Sync Trigger section
Select a shipment sync trigger
- Shipments will sync between Acumatica and Magento based on the selection of the setting on this screen. Shipment syncs will occur on the shipment confirmation or on the invoice release.
Navigate to the A to M Customer Sync Preferences section.
- Select the Customer Class(es) that will be synced with Magento.
Navigate to the A to M Order Sync Preferences section.
- Select the Order Type(s) that will be synced with Magento.
Navigate to the A to M Dropship ShipVia Sync Preferences section.
Select a ShipVia method for Dropship orders.
- A ShipVia method must be selected for Dropship orders to ensure proper syncs from Acumatica to Magento. By default, Magento does not have a shipping method to represent Dropship shipments. This allows a user to define a customer shipping method in Magento and then map it with the defined incoming value from Acumatica.
Navigate to the Additional Settings section.
- Toggle the Enable Customer Attribute Sync to Magento box.
- This feature will allow for customer attributes to sync to Magento from Acumatica.
Notes
Customer Attributes are available and supported only with Magento Enterprise Edition.
Navigate to the Individual Sync Status section. This section allows a user to toggle on the type of sync that will occur based on the business need. Navigate to the Individual Sync Status section. This section allows a user to toggle on the type of sync that will occur based on the business need.
- Toggle on the Active box next to the entity that needs to be enabled for sync.
- When all preferences have been configured, click Save.
# Configuring schema in Acumatica
The schema that is necessary to sync with Magento can be configured by the user’s needs from Acumatica to Magento. The purpose of this is to allow users to select the fields that will sync between Acumatica and Magento.
# Establishing product sync schema
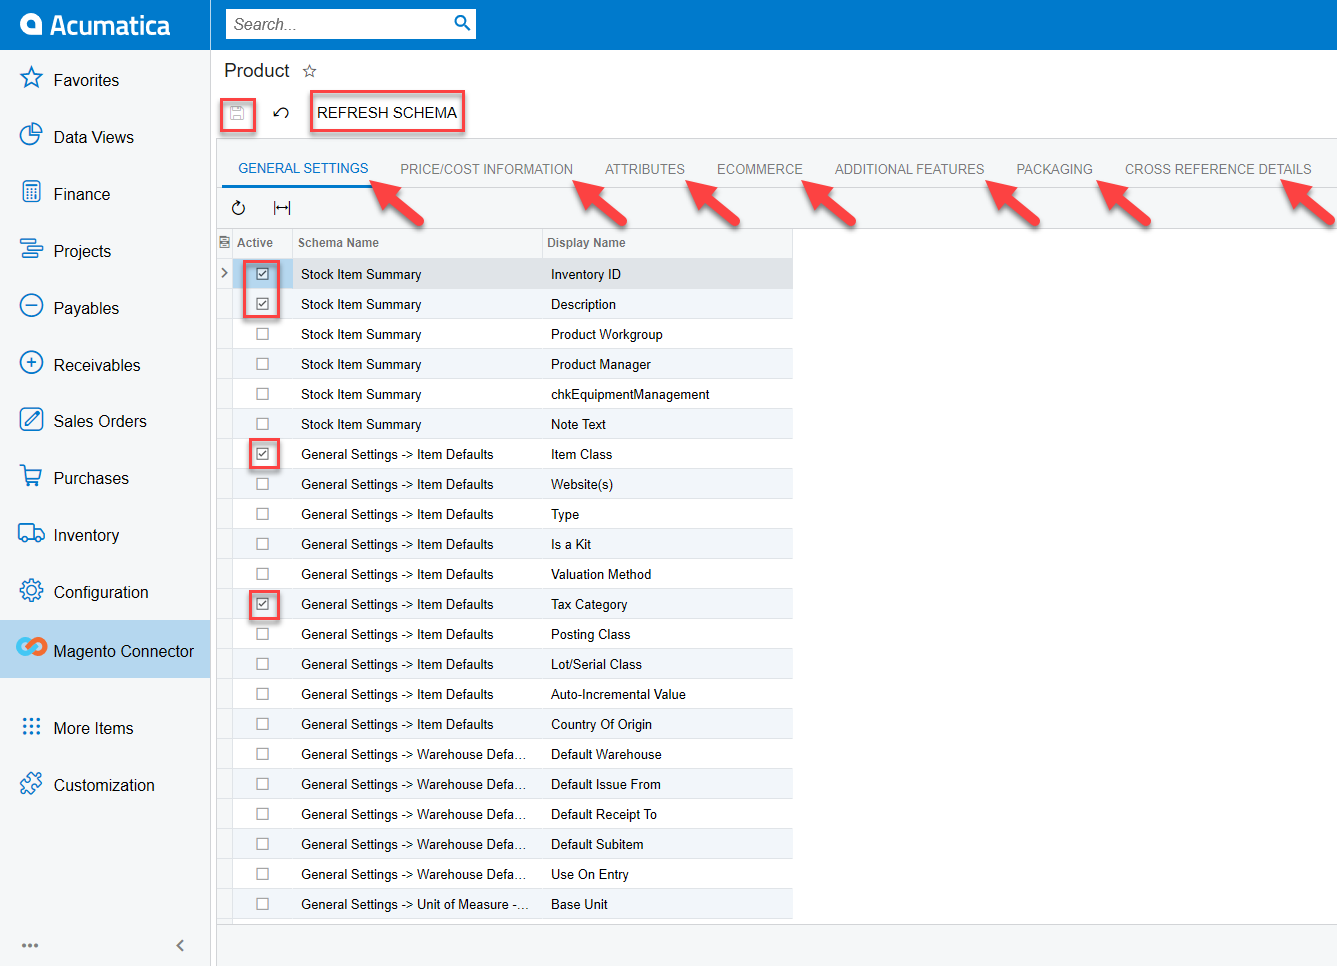
Navigate to the Magento Connector workspace and select Product under the Schema Management section.
- Click Refresh Schema.
- Select the tab of schema to enable. The tabs are:
- General Settings -Price/Cost Information
- Attributes
- eCommerce
- Additional Features
- Packaging
- Cross Reference Details
- Toggle the Active box on for all Schema and Display Names applicable.
- Click Save.
The selected schema will be active for syncs between Magento and Acumatica. The purpose of toggling the selected product schema in Acumatica is to ensure that only the schema that a user selects will trigger syncs. This reduces server load and optimizes communication between Acumatica and Magento. Product attributes will not sync if they have not been toggled on in the Schema Management section.
Notes
Some fields within Product Sync Schema will be preselected upon publishing the connector package. Fields should be reviewed prior to the connector being initialized. Any new customization fields added to these tabs automatically will appear for mapping.
# Establishing category sync schema
Navigate to the Magento Connector workspace and select Category under the Schema Management section.
- Click Refresh Schema.
- Select the tab of schema to enable. The tabs are:
- Category Info
- eCommerce
- Toggle the Active box on for all Schema and Display Names applicable.
- Click Save.
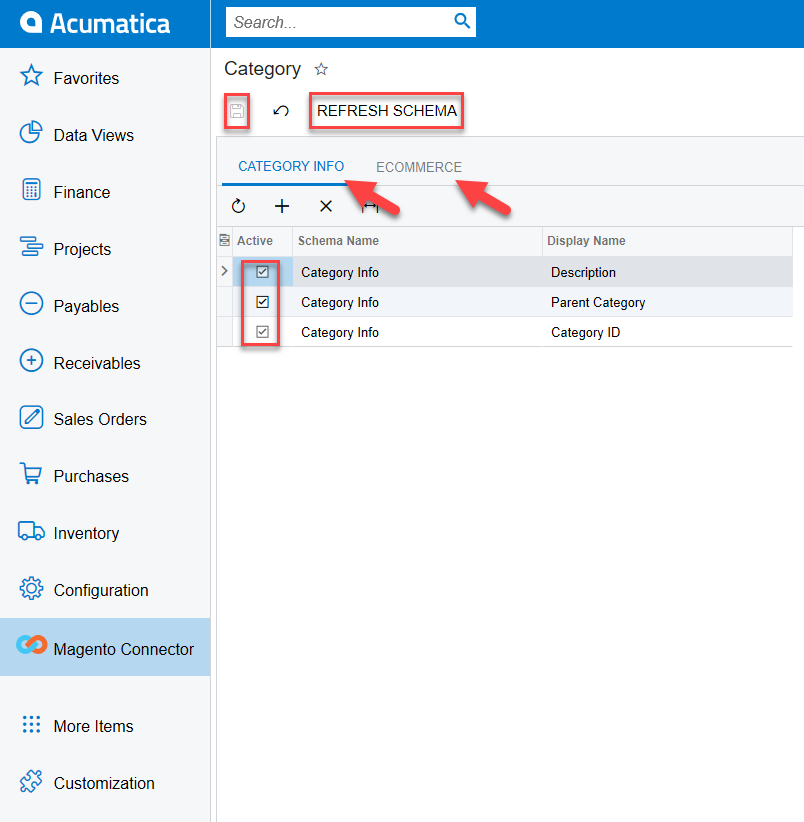
The selected schema will be active for syncs between Magento and Acumatica.
# Establishing customer sync schema
Navigate to the Magento Connector workspace and select Customer under the Schema Management section. Note there are two extra columns in this schema management: API Reference Field Path and API Input Field Name. This contains the direction and destination of the selected field using Acumatica’s API framework. These are fields that can be modified to the needs of a user based on the schema that are being synced.
- Click Refresh Schema.
- Select the tab of schema to enable. The tabs are:
- General Info
- Billing Settings
- Delivery Settings
- Payment Methods
- Salespersons
- Attributes
- Activities
- Mail Settings
- Toggle the Active box on for all Schema and Display Names applicable.
- Click Save.
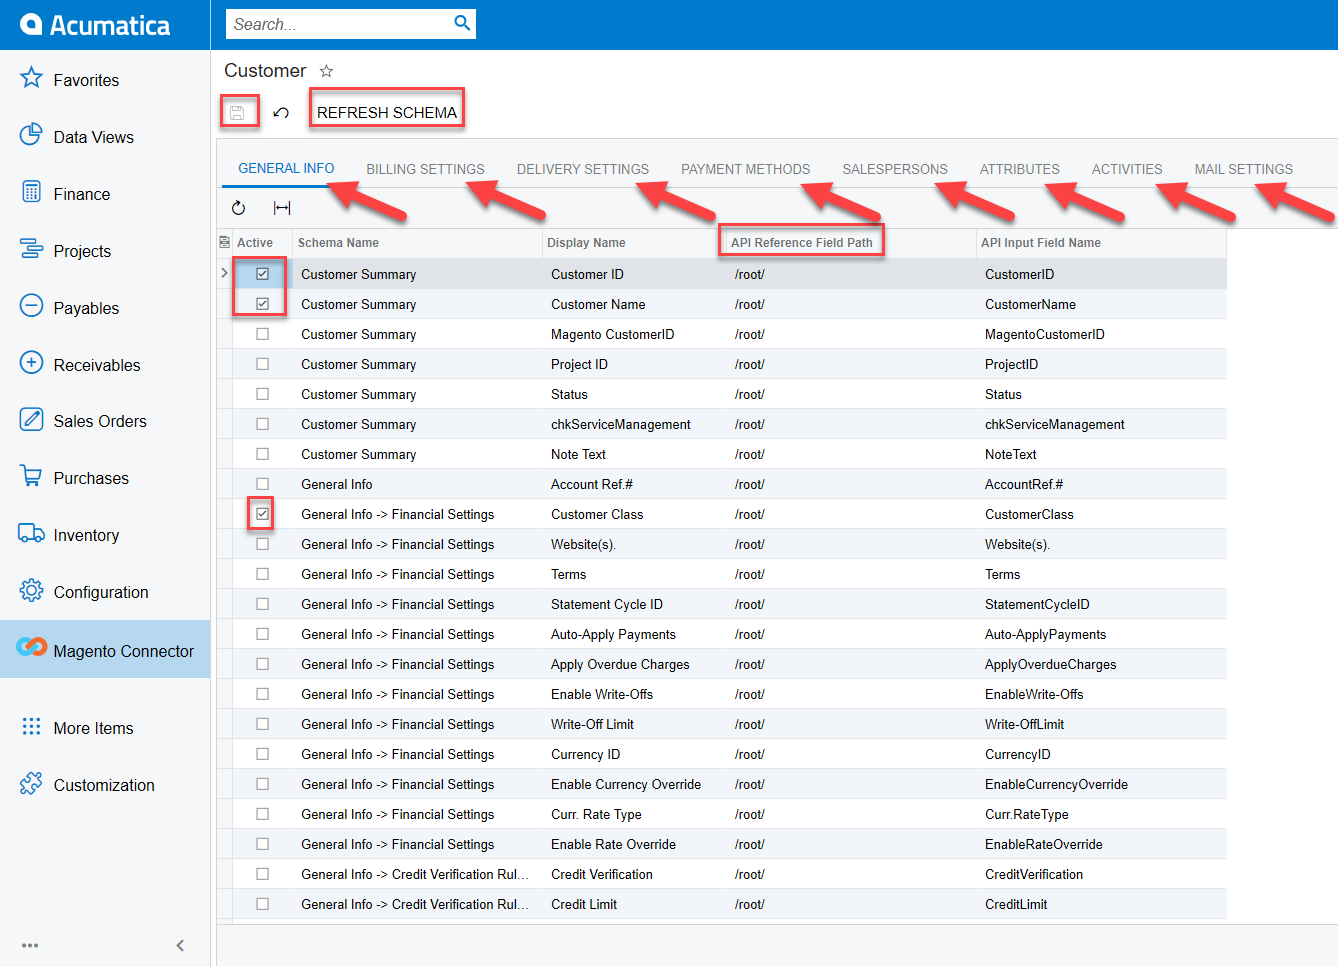
The selected schema will be active for syncs between Magento and Acumatica.
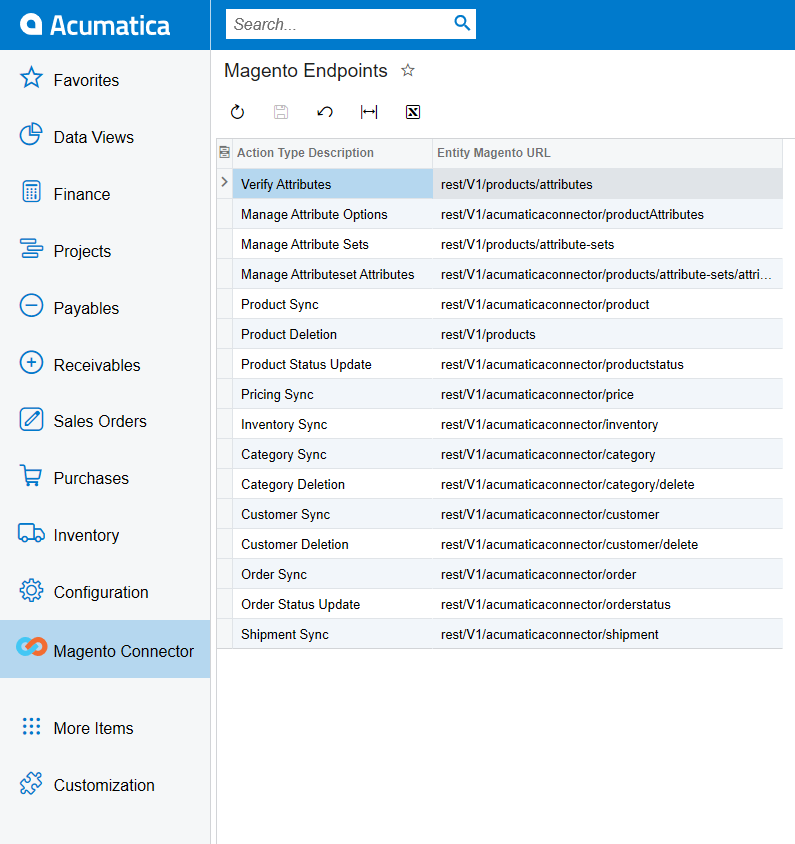
# Viewing Magento endpoint URLs in Acumatica
The Magento endpoint URLs are established with the installation of the package and initialization of the connector. The endpoints will display the destination of data transfers from Acumatica to Magento using Magento’s REST API functionality.
Navigate to the Magento Connector workspace and select Magento Endpoints.
Displayed are the Action Type Description and their corresponding Entity Magento URL. These endpoints display where API calls will be made to and from given the action type being performed.
# End User Scenarios
After all fields have been configured, mapped, and tested, the connector is ready for use.
# Initializing the connector
When the package has been successfully published, the connector must be initialized. The purpose of this is to establish the GI, queue, and push notification capabilities of the connector in Acumatica. Navigate to the Magento Connector workspace and click Initialize.
- Click Initialize.
The connector will establish the MSMQ connection and check for the presence of the Commerce Basic package. If the Commerce Basic package is not published, the connector will not initialize and render an error message. All queues, general inquiries, push notifications, and schedulers will then render after the MSMQ and Commerce Basic package have been checked.
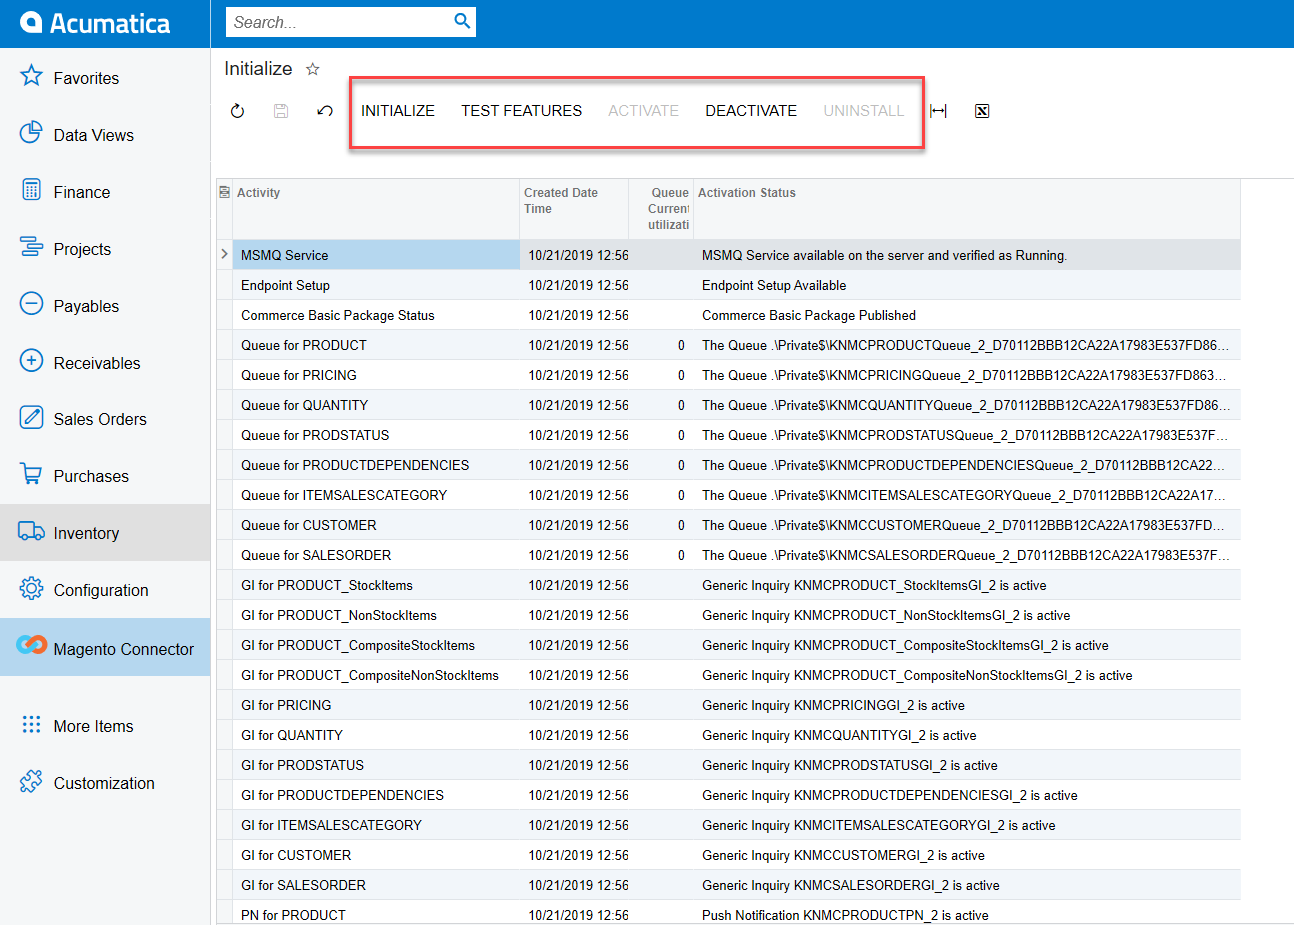
After the connector has been initialized successfully, the connector will now be available for testing and deactivation.
Test Features will allow a user to test the connection, rendering a success or error message to ensure proper configuration.
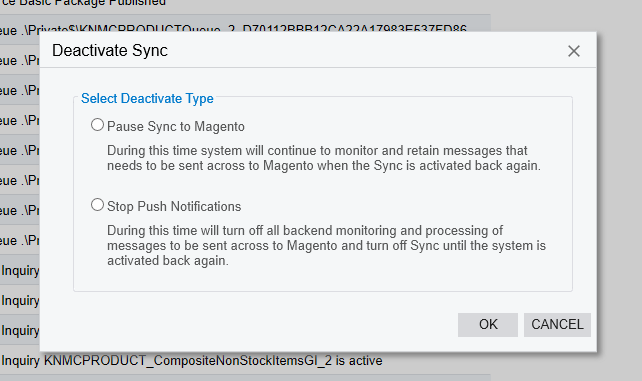
Deactivate will allow a user to Pause or Stop the connector.
- Pause Sync to Magento will allow a user to stop the sync to Magento while still collecting data to be sent to Magento when the sync is reactivated. Data will be monitored and sent when the sync is re-established. Clicking Activate will reactivate the connection.
- Stop Push Notifications will allow a user to stop the sync to Magento and data collection for sync to Magento. No data will be monitored or synced.
If a user has selected Stop Push Notifications, then the Uninstall button will be available for selection. This button allows a user to delete all queues, schedules, generic inquiries and push notifications that were established by the initialization of the connector.